HOW MUCH FLOORING
(SQUARE FOOTAGE)
WILL YOU NEED?
Deciding which floor is right for you is a good first step. Eventually, you’ll have to make a decision on how much of the beautiful new floor to purchase. When this topic comes up, you may find that the answer you come up with is the same as most people who are in the same position: “I have no idea.” Don’t worry. It is simple to figure out. If you are working with a retailer, many times they will be able to send someone out to your home to measure the floor space for you. If you’re a do-it-yourselfer (or just like to know how they come up with the number), this page will walk you through the simple process of finding the square footage of your floor space.
Getting Started
If you’ve never done anything like this before, it’s okay. Like most things, it seems more complicated than it really is. To get started calculating the square footage of your home or business, you’ll just need a few simple things:
- Tape Measure
- Pencil or Pen
- Paper
- Calculator (Your phone probably has one.)
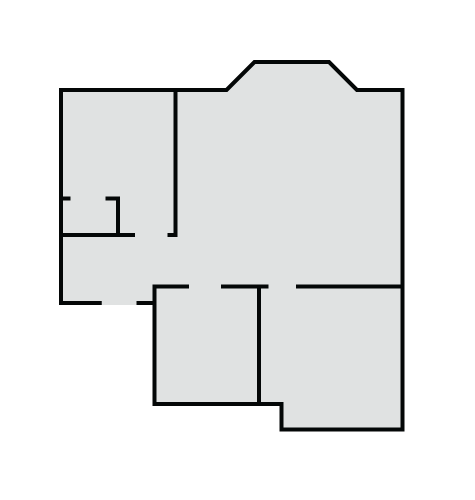
Sketch out a loose, overhead drawing of what your space looks like from the top down. It doesn’t need to be exact or professional looking. For this example, we’ll be using a diagram of a one-bedroom apartment shown to the right. Yours will look different, but the same rules still apply.
I don’t own a pencil…
Help me find someone to do this for me!


Keep It Simple
When you look at the floor plan that you have drawn, it may look overwhelming with all of the doors and angles and different rooms. If we look closer, though, we’ll see that it is really just a series of rectangles.
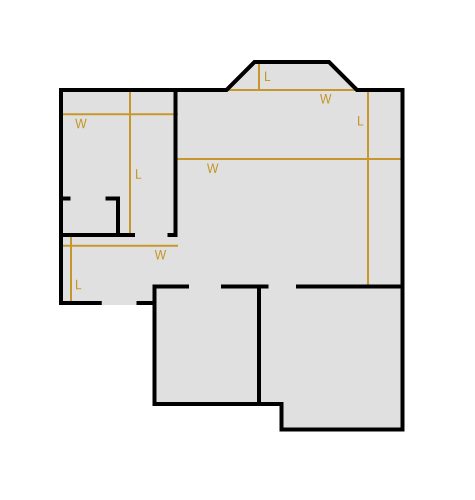
In this diagram, you’ll see that all of the floor areas have been broken up into rectangles. In some cases, the rectangle goes outside of the actual plan (the dark green, for example.) In another case, the pink rectangle is sticking out into one of the other rooms. All of this is okay. When we order the flooring, we’ll need to order a little more than the exact square footage calculation (more on this later.) So having an extra couple of square feet in our measurements will not make a noticeable difference.
Where is the flooring going?
On your floor plan, cross out the rooms that will not be getting a new, hardwood floor. In our example apartment, let’s say we’ve decided to put matching tile in the kitchen (yellow) and bathroom (teal) since they can both be seen from the living room.
This means, we only need to calculate the following areas:
Living Room – Green
Bedroom Room – Blue
Entryway – Pink
Pro Tip
Don’t forget the closets! If the closet is built into the room, then it will be included just by measuring the full width and length of the room. However, if the closet is offset into a different room, you will need to measure the closet floor in order to make sure that your closets have a floor that matches the rest of the room.
One Step at a Time
Now that you’ve identified the areas that you’ll need to measure, all that’s left is to grab the measuring tape. All that you need to do now is to measure each direction (length and width) for the rectangles you’ve made.
Remember: Keep it simple. In this example, remember how many small rectangles made up the bedroom area (blue above)? You can see in this diagram, all of those small rectangles can be taken care of with a single measurement.
Did you notice that the square footage for this entire example can be calculated with 4 sets of measurements? Pretty easy, right?
Now it’s your turn. In every part of your house or business that will be getting new flooring, just measure from one side to the other (length) and then turn and measure the other direction (width). Remember: if a room has a corner cut off diagonally or a small inset from another room jutting into the space, just ignore it and consider the room to be one big rectangle.

Pro Tip
Measure in inches! To prevent having to combine fractions or compound numbers, keep your measurements in their simplest form. If the measuring tape reads 128 inches, just write down 128. You don’t need to know how many feet are in 128 inches. We’ll change it all to feet at the very end.
All That’s Left
Now that you’ve got all of your measurements written down, all that’s left is to put them all together. If you think back to high school geometry, you will remember very clearly thinking “I’m never going to need any of this stuff.” You should now apologize to your old geometry teacher. (Don’t worry. We looked it up on google. We can help you out with this part.)
To calculate Area (square footage, in this case), you simply multiply length by width.
Area = Length x Width
To put it another way:
The Number You Need = The Number You Have x The Other Number You Have
Which number should go first? That’s the best part. It doesn’t really matter. Just pick your favorite, punch it in to your calculator, and then multiply it by the other number for that rectangle. Whatever number the calculator now says… write that down in the area you just calculated. Do that over and over until you have a big number in the center of each area you have measured.
I understood there would be no math…
Help me find someone to do this for me!
It’s Time to Finish Up!
You’re almost done. There is still one last part to figure out. If you remember above, we didn’t care too much about small juts into the room or diagonal walls. The reason for this will be explained now.
When purchasing new flooring, you’ll need to calculate 5% worth of overage. Overage is not some clever marketing trick to make you buy more flooring than you need. It is a very important part of the installation. The reason why overage is important is because of a few different factors:
Not every board that comes out of a box will be useable. If the tongue or groove on a board is damaged, then that piece can’t be installed into the floor. Sometimes, a knot will expand or contract after the board if boxed, causing the board to split or warp.
The installer may make a mistake. Please don’t expect your installer to get every single board perfect every single time. That is not realistic. If a nail gun slips, if a hammer is dropped, if a board is mis-measured or mis-cut… these are all things that happen because we are all human.
The major reason for a need of overage is this one. At the end of every row, the installer will need to cut the final piece to fit. Generally, an installer will try to cut the piece that is the closest to the needed length, to prevent an unnecessary loss of flooring. Even so, they’ll be cutting off between 6 inches to 2 feet of a floor board. Once this piece is cut, the extra will likely not be usable anymore.
Length A x Width A = Area A
Length B x Width B = Area B
Length C x Width C = Area C
Length D x Width D = Area D
…and so on
Total Area = Area A + Area B + Area C + Area D
Overage Needed = Total Area x .05
Total Amount of Flooring Needed = Total Area + Overage Needed
Convert to Square Feet = Total Amount of Flooring Needed / 144
Get Your Calculator Ready
All of this math may look scary, but you can handle it with your very fancy calculator. Let’s take it one step at a time.
So far, you’ve:
Broken up each room into simple rectangles
Measured the length and width of each rectangle
Multiplied each length and width together to find the area of each rectangle
Now, add all of the Areas (L x W) that you have written down. Once you’ve added all of those numbers together, you’ll have the Total Area of your space.
We’ll need to find how much overage to get. To get that answer, find five percent (5%) of the Total Area. Five percent on a calculator can be written .05 (decimal zero five). So, multiply Total Area by .05. This gives you your Overage Needed.
All that’s left is to add them together. Add your Total Area to the Overage Needed and that answer will be the amount of flooring you need to order.
Important: Don’t forget that, so far, everything has been measured in inches. The answer we currently have is being shown in square inches. But flooring is sold in square feet. All we need to do is divide the final number by one-forty-four (Total / 144) and that will give us our amount in square feet.
Length A x Width A = Area A
Length B x Width B = Area B
Length C x Width C = Area C
Length D x Width D = Area D
…and so on
Total Area = Area A + Area B + Area C + Area D
Overage Needed = Total Area x .05
Total Amount of Flooring Needed = Total Area + Overage Needed
Convert to Square Feet = Total Amount of Flooring Needed / 144

